Getting Started with GitHub for dbatools
I’ve recently started contributing to the dbatools project and it’s all done through GitHub. Prior to this, I’d never used git and GitHub for anything more than an offsite repository for my own small repositories (I’ve used Subversion for over a decade) and I never totally understood how it worked in a large collaborative project until this came along.
I’m putting this together here for my own reference and to hopefully write it up in a way that helps things “click” for some people who need that extra nudge to get into “aha!” territory. A number of the examples I’ve seen elsewhere have mixed the command-line and GUI clients, but the more I use git GUIs, the less I like them for the basic workflow. You only need to know a handful of commands to be productive and for that, the command line beats the GUI in my opinion.
So, here we go. My GitHub workflow for working on dbatools, with as much command-line work as possible. This walk-through assumes basic familiarity with source control concepts.
-
If you don’t already have one, get yourself a GitHub account. While you’re doing that up, please set up two-factor authentication.
-
Install a git client. If you install GitHub Desktop, it’ll come with the command-line client. I think GitKraken does as well. If you use macOS or Linux, you should already have the command-line client.
-
Go to the dbatools main repository and click the Fork button on the upper-right corner.

-
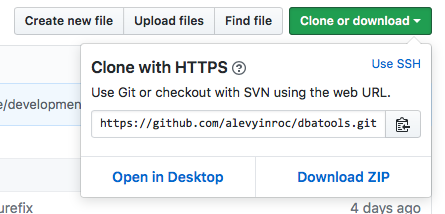
Now it’s time to get a copy of the repository onto your computer. Hop over to your profile on GitHub and get into your fork of the dbatools repository. Click the Clone button and copy the URL.
 Now open up your command line interface of choice and point it at the directory where your local copy is going to reside and run the following (using the URL you just copied):
 git clone https://github.com/YOURNAME/dbatools.gitThis will create a directory nameddbatoolsin the current directory and pull the entire repository down into it.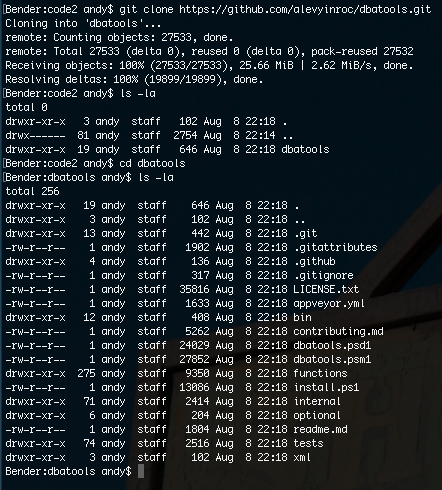
Congratulations! You’re ready to start coding. Almost.
-
In order to keep up with the very rapid pace of the main project, you’re going to need a way to keep pulling in the changes that happen upstream from your fork. When I started working in GitHub, this was one of the most confusing things to me, so here’s the secret:
git remote. I found this page that explains in a generic way what needs to be done. In English, you configure your local copy of the repository so that it knows about the next repository beyond what you cloned from, so that you can pull updates from there. For dbatools, run the following commands:

git remote add upstream https://github.com/sqlcollaborative/dbatools.git
git fetch origin
git fetch upstream
git merge upstream/master
git push origin
What’s this doing?
- Set the an alias in your local repository called
upstreamthat points at the main dbatools repository. - Fetch all changes from
origin(your fork on GitHub) - Fetch all changes from
upstream - Merge all changes from the
masterbranch ofupstreaminto your local repository - Push everything back up to your fork on GitHub (but at this point, there’s nothing to push) Keep those handy; you’ll use them a lot (see the “Maintaining your repository/fork” section below). Now you can check what remotes you have set up for your repository with
git remote -vand verify that you have anupstreamthat points to the main repository.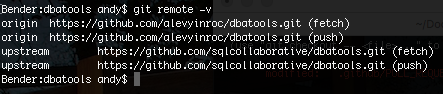
- Git projects (including dbatools) make very heavy use of branches and merging. In this context, branches are a lightweight way of keeping your changes separate from one another. You can code against one branch, commit your changes, then switch to another branch to work on another set of changes altogether without disrupting the first set. In the dbatools main repository, the
masterbranch is considered the release version. All development work is done using thedevelopmentbranch as a starting point. So, it makes sense to set up your fork and local repository the same way. We’ll create our owndevelopmentbranch withgit branch development.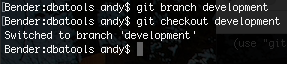
- Creating a branch doesn’t mean that you’re automatically working in it. Switching to a branch is done with
git checkout(if you’re accustomed to Subversion, this new usage ofcheckoutmay seem odd). Runninggit checkout developmentswitches into the new branch. Ready to code? Just about. - You’re working in
developmentnow but it’s strongly recommended that you create a new branch for each new logical set of changes as it’ll make issuing Pull Requests easier and more manageable (PRs are merged into the main development branch). You want to create this branch fromdevelopment, so now that you’re in that branch, you’re going to branch again. This time we’ll shortcut withgit checkout -b Fix-Updates. This both creates the branch and checks it out with a single command.
- OK, now you can get your code on. The dbatools maintainers prefer that you make each change set only one file, or a small number of files (if they’re all related to one change) to make merging into the main project easier. What are you waiting for? Get in there and code!
- You’ve got some great code written and you’re ready to commit. First, let’s look at what’s changed with
git status
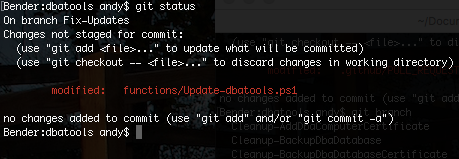
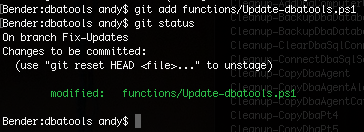
git shows that one file has been changed, but it’s not able to be committed yet. For that, you first have to add it (another difference from Subversion; this file is tracked, but you have to add or “stage” it for this commit) and git even tells you how - git add functions/Update-dbatools.ps1. Once that file is added, re-check your status and you’ll see that the file is taken care of.
- Now that everything is staged and ready to go, it’s time to commit. Do not be afraid to make lots of small commits to your repository as you work so that you can fall back to an earlier version if something goes wrong. Make sure you’re including a useful message along with your commit so that people (yourself included) know what’s going on six months from now. You commit with (conveniently enough),
git commit.git commit -m "This is my awesome commit message" - Great! You’ve committed your changes to the local repository, now how do you get them back up to GitHub? By pushing them to the origin (your GitHub fork). Run
git pushand you’ll be informed that you can’t do that quite yet.
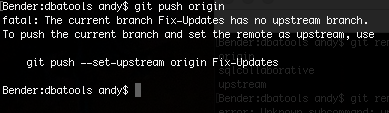
Copy & paste that, and you’ll get your changes pushed up to GitHub.
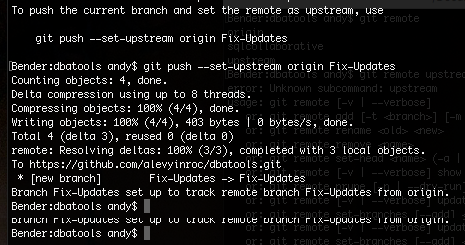
Note that the second attempt was only needed because origin was unaware of the branch. Subsequent pushes to this branch can be done with just git push.
13. We’re almost there. Jump back to your web browser and refresh your repository. You’ll see that your new branch is front and center. To get your changes in front of the dbatools maintainers, you need to issue a Pull Request via that green button on the far right.

By default, the master branch of the upstream repository is used as the basis for comparison; you need to change this by selecting development from the drop-down.
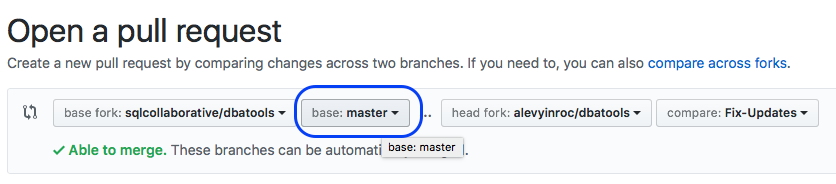
Then fill out the form as completely as possible and click Create Pull Request.
Congratulations! You’ve just submitted your first change to the dbatools project for review. You’ll probably get some comments on your first PR. And your tenth. And your hundredth. And that’s okay! They’re constructive comments meant to help you and make your code better - it’s not an indictment of your programming skills or DBA knowledge or experience. Your contribution is definitely appreciated. The dbatools team wants to put out the best code possible and collaboration is the best way to do that. Everyone is working toward the same goal and it’s a learning experience through and through.
Anyway…there may be some conversation on your PR about suggested changes, things to remove, things to add into it, style, etc. Please don’t give up & walk away, but don’t just blindly do whatever is suggested either. If you have good reasons behind your decisions, present them. The team is there to guide you and shepherd the project, keeping the quality high, so it may take a couple resubmissions before your code is ready for prime time. What’s really cool with GitHub is that if you make further changes to your branch, the Pull Request is updated automatically when you push that updated branch back up (this is why it’s important to create a new branch for each change that will become a PR).
And then, when that’s finished and Chrissy accepts your PR and you get that “Merged” email with an emoji (I think Chrissy always puts an emoji in them), you can sit back and smile.
Workflow Snapshot
That’s a lot of steps. Here’s the short-short version:
- Fork
sqlcollaborative/dbatools - Clone to your computer
- Set
upstream - Create a local
developmentbranch - Merge
upstream/developmentinto local development - Create & check out feature branch
Fix-Updates - Code
- Commit
- Push
- Issue Pull Request
Steps 1-4 you’ll only do once; everything else is the work cycle that you’ll get accustomed to quickly.
Where am I working?
If you’re working on multiple changes over time, or even if you’ve worked on a series of changes (completing one before moving on to the next), you’ll find yourself with a number of local branches and it’s easy to lose track of where you are. git branch will tell you what branches exist, and highlight in green the one that you’re working in.
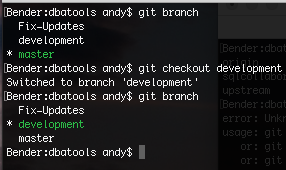
Remember that you always want to check out development before creating a new branch.
Maintaining your repository/fork
As you work on dbatools more, you’re going to have to manage your branches and keep up with the Joneses…I mean upstream. The good news is that thanks to the work you did earlier in setting up an upstream repository, the latter is pretty easy.
Keeping up with development
To keep up with upstream’s development branch, switch into your development branch, then pull things down into it and merge. You should do this pretty often; anytime you start a new branch (remember, you’re branching off development every time you start new work, so you want the freshest code possible).
git fetch upstream
git merge upstream/development
This will pull the latest changes from upstream into your development branch. Then you’ll want to push that back up to Github the same way you pushed your Fix-Updates branch up to GitHub.
You should also merge in from upstream/master occasionally. Switch to your master branch with git checkout master and do the same as above:
git fetch upstream
git merge upstream/master
You’ll also want to maintain your origin/master branch the same way; just use origin instead of upstream in the example above.
Conclusion
I hope that this has been easy to follow and gets you started down the road of contributing to dbatools or another Open Source project on GitHub. git looks intimidating from the sheer number of commands it has and the crazy things you can do with it, but for a normal, simple workflow there’s only a handful of commands you need and in many cases if you get a command slightly wrong or miss a step, it’ll help you out. The most important thing is to read the contribution guidelines before jumping into the deep end, and if you have any questions please don’t hesitate to ask in the #dbatools channel on the SQL Community Slack.